Microsoft recommends the Graph API for access to Azure AD elements – but that means web development, isn’t it? Well – not quite … there are certainly ways for PowerShell scripting with the Graph API. As already mentioned in my general blog post about the various scripting APIs for accessing Azure AD and Office 365, there are many interesting areas that can ONLY be reached via Graph. For example, if you want to access the Azure AD Audit Logs, the Sign-In Logs, the list of Risky Sign-Ins, the Security Alerts – or if you want to read or create Conditional Access Policies. Really a lot of interesting stuff, so you definitely shouldn’t miss out on it.
First of all, the official label is “Microsoft Graph“, please forget the old API “Azure AD Graph” – Microsoft will do no further development for the old API. There is a very short list of scenarios where the old Azure AD Graph can do something that the new Microsoft Graph cannot do (yet). Most of it is already announced to be included in future Microsoft Graph versions (here is the corresponding Microsoft blog post about it).
Second fact: Microsoft Graph is a REST API, so you need to create HTTP POST and GET requests. For authentication, you need to create an access token first, which can be handed over during the session initiation. It’s a bit more complicated than just loggin’ on with a username and password. – especially if you are not familiar with HTTP requests.
So now let’s start the scripting with Microsoft Graph – but wait: You have to prepare something first. As I said before, you cannot just authenticate with your Azure AD username and password and then start using the Microsoft Graph. You always need to create an Azure AD Application with the appropriate API permissions. Don’t worry, you don’t need to start Visual Studio – we just need an Application Registration in the Azure AD portal.
By the way- if you already know the app preparations and just want to see the PowerShell script for Graph: this way, please!
Creating a new App Registration
The following steps are necessary if you want to access Azure AD components with the Microsoft Graph API. You can click on all screenshots to enlarge them…
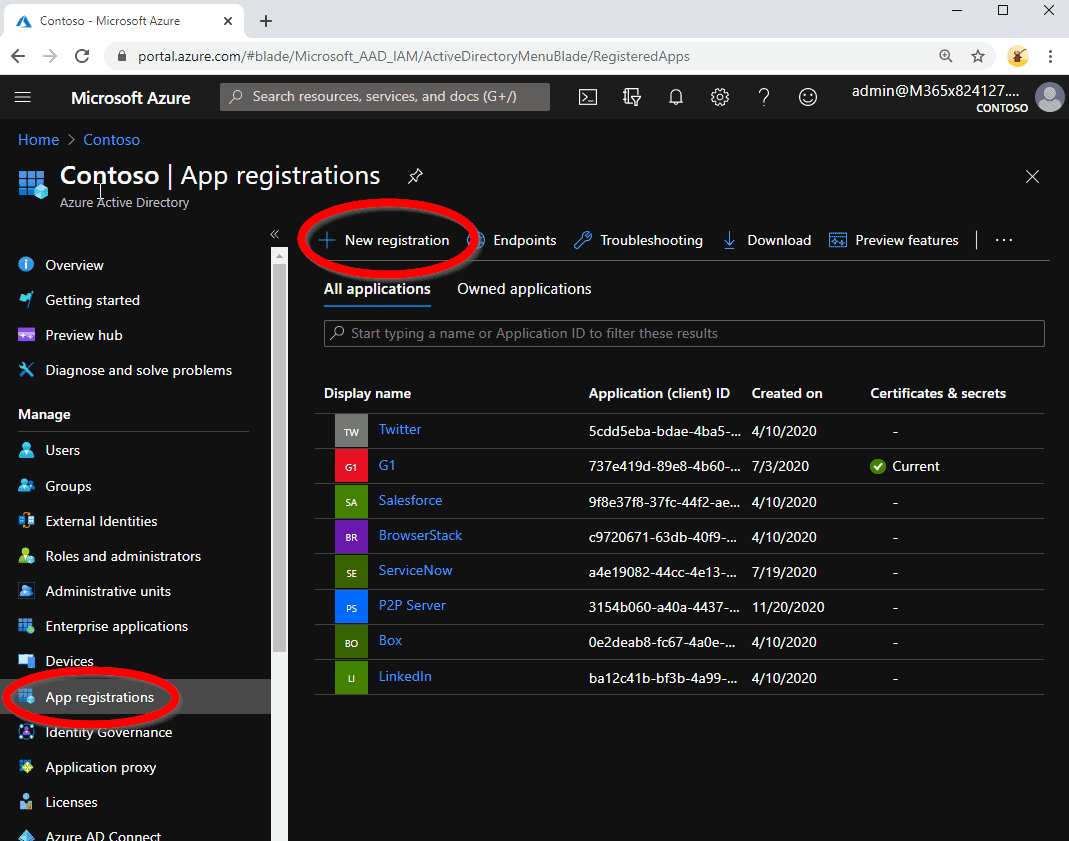
First, open the Azure AD admin portal website and go to the App Registrations. Click on the “New Registration” button:
You have to set a name for your ‘app’. Let the other settings untouched:

After your new App Registration has been created, copy the Application (client) ID – you will need it later in your Microsoft Graph script.

Then we have to add the appropriate permissions to you new App Registration:
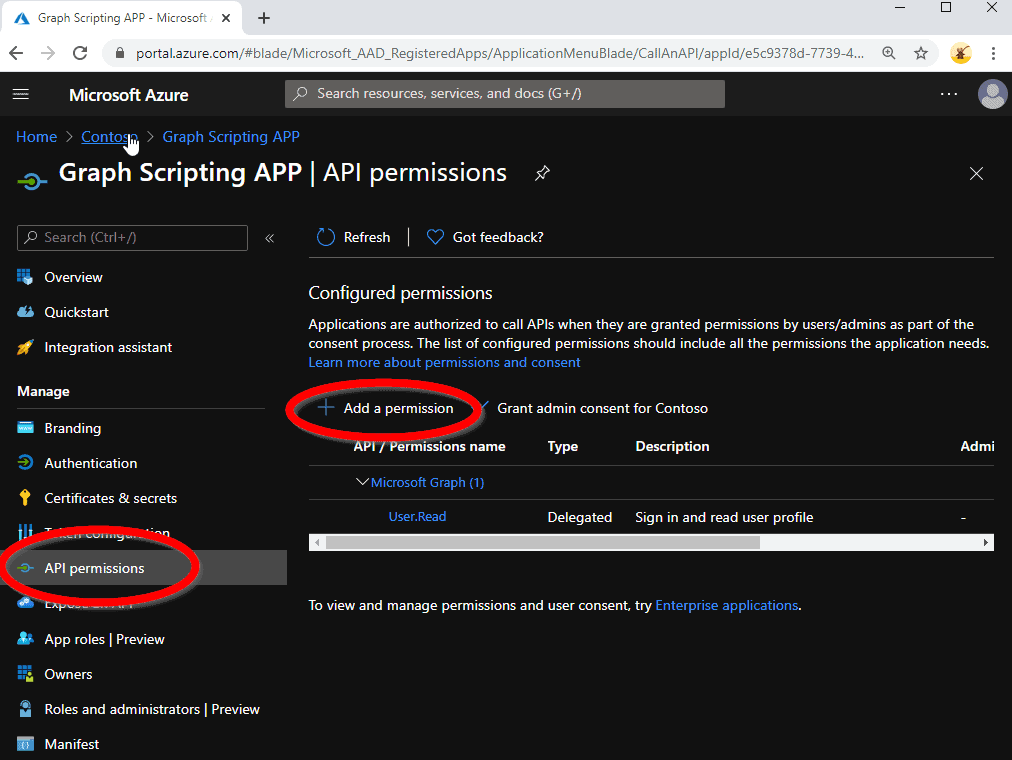
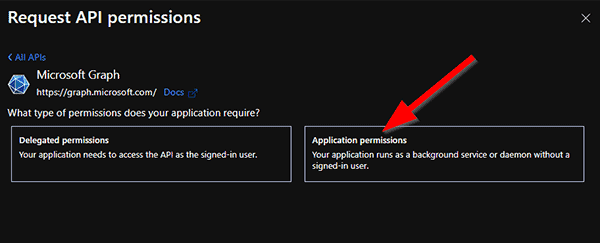
It has to be a Microsoft Graph permission – there are two different basic types here. We do not use a “Delegated permission”, these are used for real applications where the app acts as the account which uses the app. We rather need the “Application Permission” type, because your script will later act as the app itself and therefor needs these direct permissions:
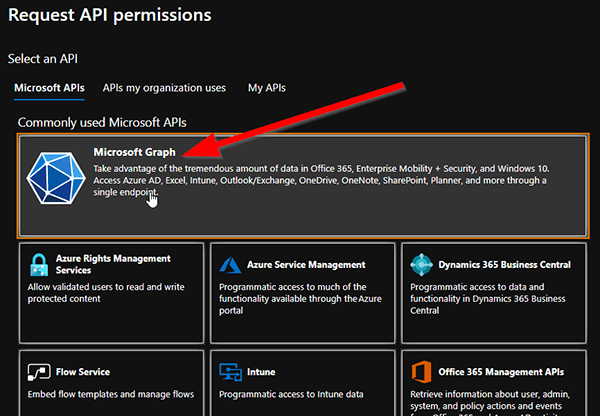
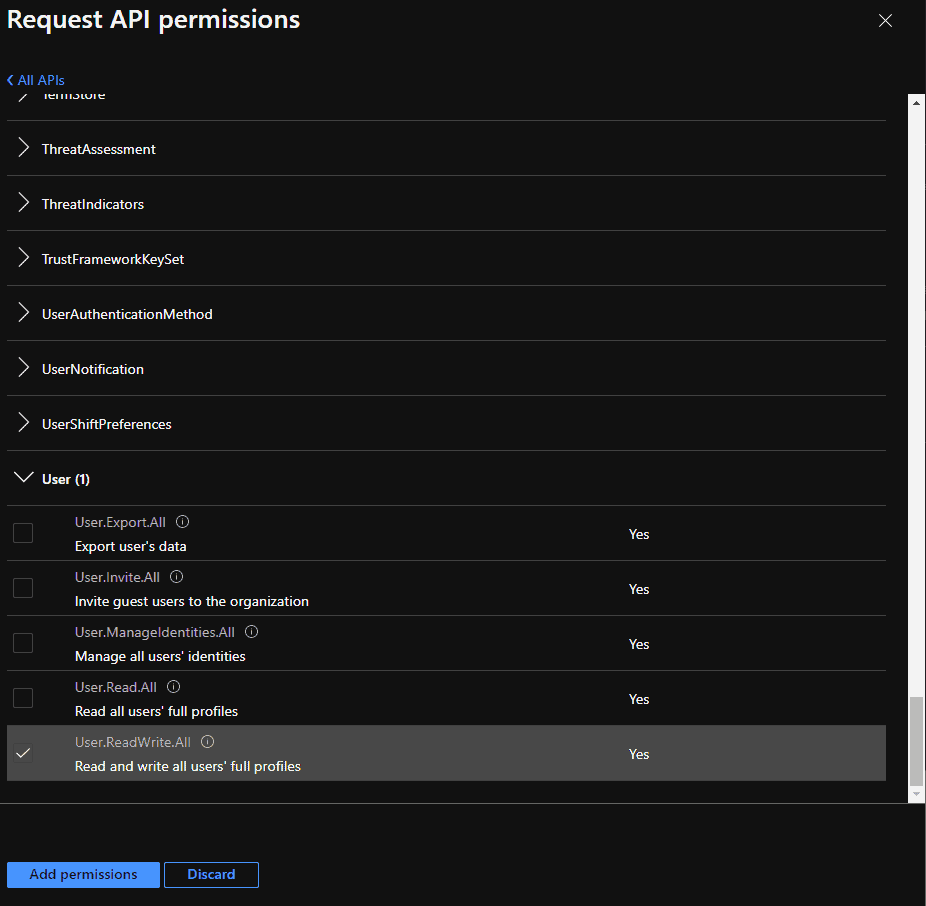
There are a large number of different permissions now that you can grant – your exact needs depend on what you plan to do in your script. If you refer to the Microsoft Graph Permission reference, you see exactly what permission is needed for a certain action here.
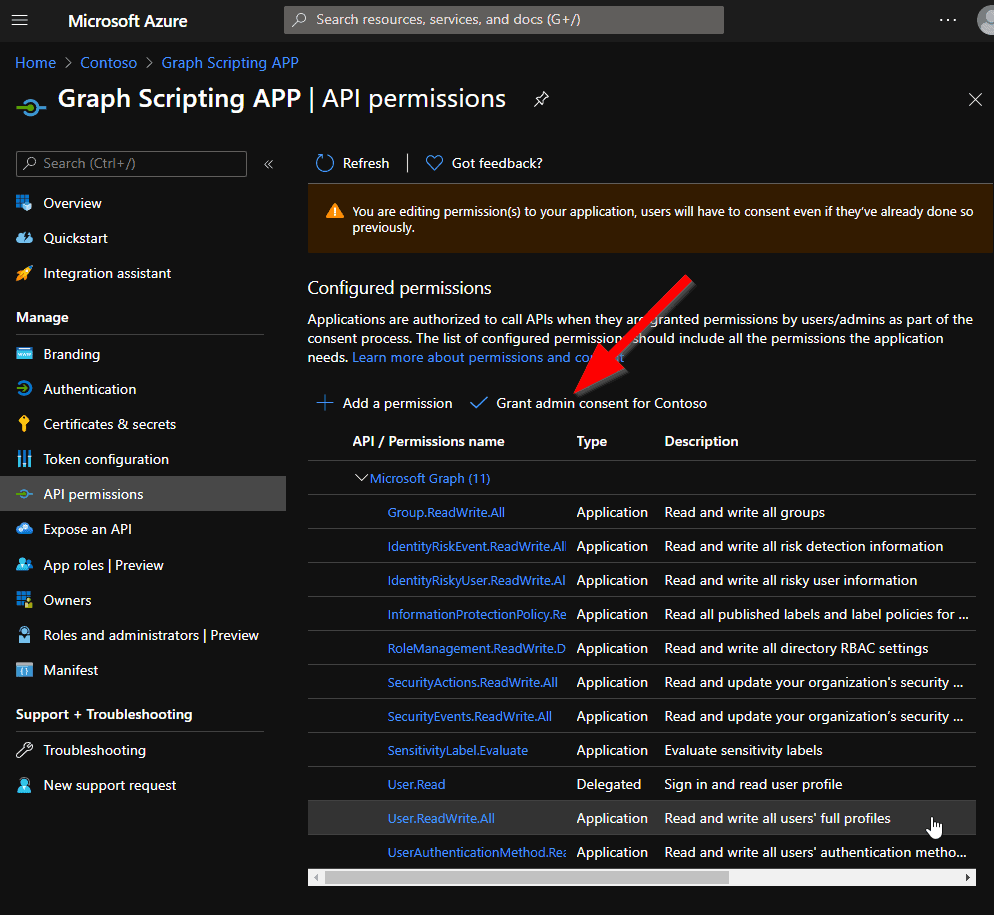
If you assigned all necessary permissions, you will need to grant admin consent for your apps (on the permission list page):
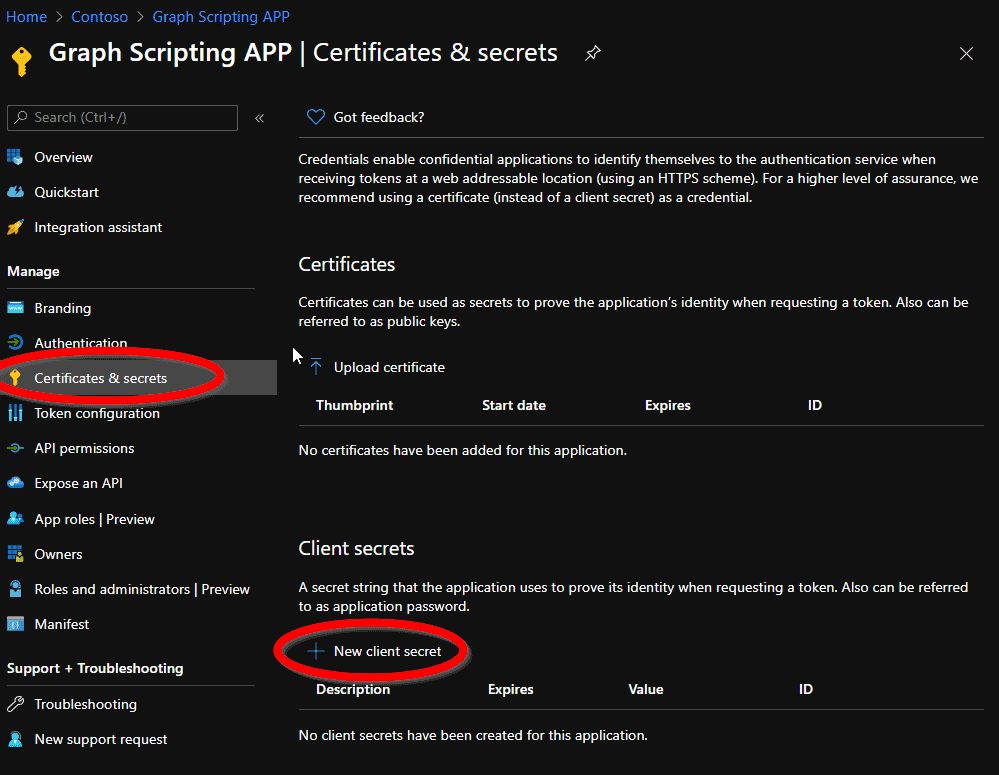
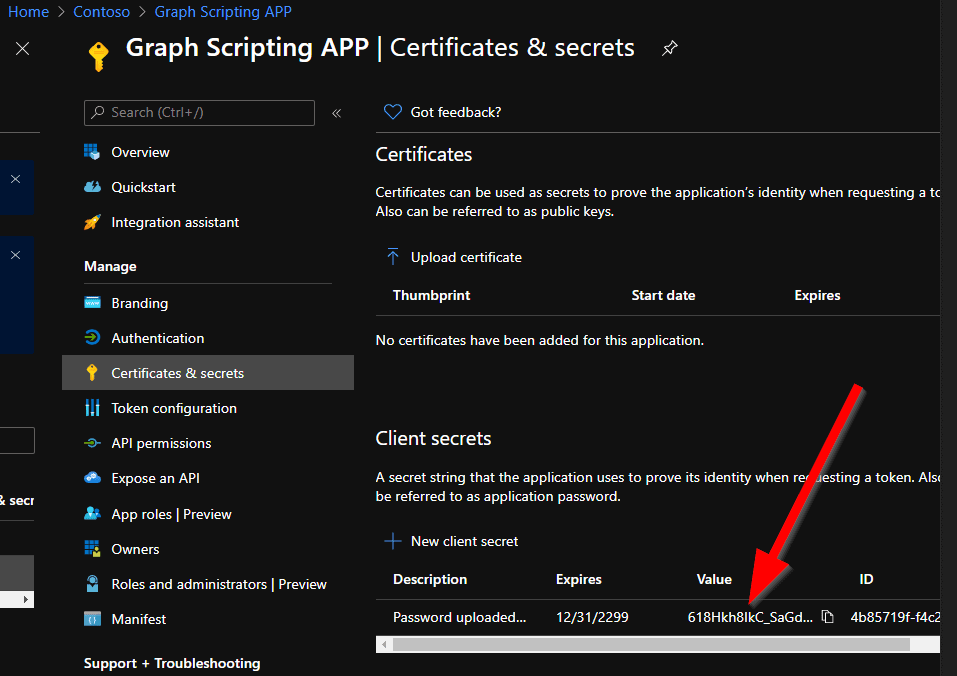
Last thing: Your app needs a secret to authenticate with – it’s comparable to a password. The secret doesn’t need a description or an expiration date.
After secret creation, all you need is to copy the value – you will need it later in your Microsoft Graph script. You cannot read the value again if you close this page. Otherwise, you will have to create a new secret for yourself 🙂 Please remember that everyone who knows this secret value can act on your Azure AD tenant with the specified permissions, so take care.
The Values you need
OK – we are almost finished. You created the app registration and you got two important values: The App ID and the Secret. The last thing you will need to start Graph scripting with PowerShell is the primary domain name of your tenant – the one with the trailing ‘.onmicrosoft.com’. If you don’t know it exactly: It is shown on the Overview page in the Azure AD admin website. In our example, we got these values:
- App ID: e5c9378d-7739-4d23-bf96-41c451900d71
- Secret: M3X9hGJb432y.tTxOsQ.ZNK~8hP4tc6.uY
- Primary Domain: M365x824127.onmicrosoft.com
Other Prerequisites? Modules? PowerShell 7?
You created the app registration in your Azure AD and got the values mentioned above? Then you are ready to go. No additional module needed :). This means that you could use the ‘real’ PowerShell 7 engine (which is not fully usable i.e. with the AzureAD module or the MSOL module).
The Graph example script for getting the Azure AD User list
In our script, we start with simple things. We just want to read the list of user accounts in the tenant. OK, we also could get this much more easily with the Azure AD PowerShell module, but it’s a good demonstration how to script the Graph API. Basic approach for each GRAPH access:
- Create an OAuth access token based on your App Registration we prepared before
- Prepare an HTTP header including this token as an authentication parameter.
- Do a PowerShell web request against the Graph Backend – if you read something, it’s an HTTP GET, if you create/write something, it’s an HTTP PUT.
- Read the results. In most cases, data is coming back from graph in JSON format, you can use the appropriate PowerShell conversion cmdlets for this.
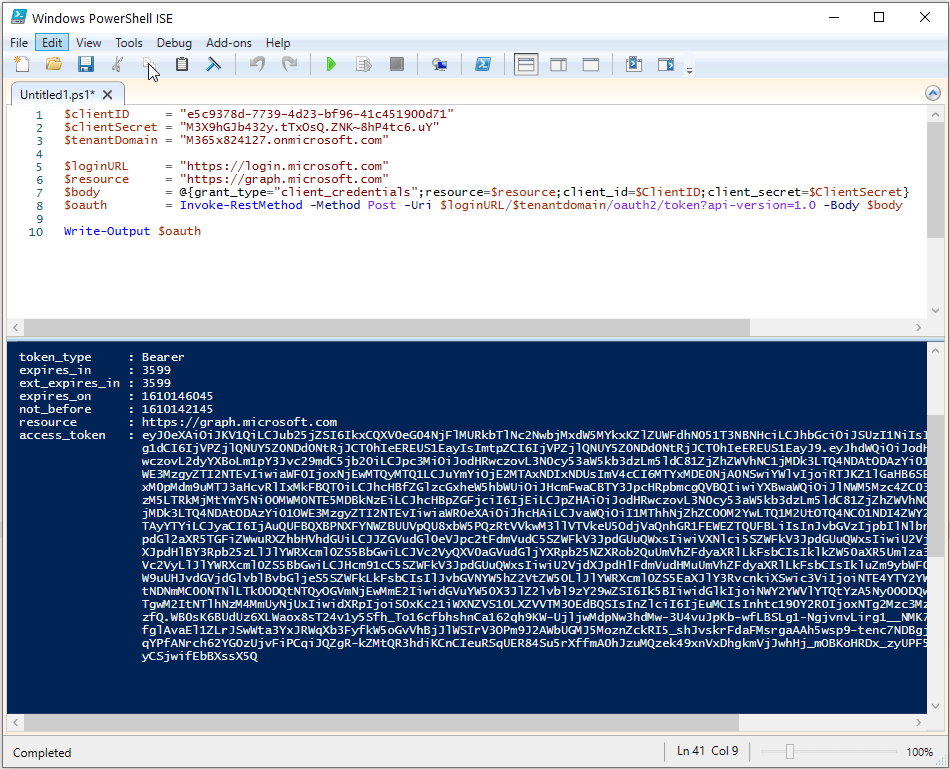
Let’s first create an OAuth access token with our data and have a look at it:
$clientID     = "e5c9378d-7739-4d23-bf96-41c451900d71"
$clientSecret = "M3X9hGJb432y.tTxOsQ.ZNK~8hP4tc6.uY"
$tenantDomain = "M365x824127.onmicrosoft.com"

$loginURL     = "https://login.microsoft.com"
$resource     = "https://graph.microsoft.com"
$body         = @{grant_type="client_credentials";resource=$resource;client_id=$ClientID;client_secret=$ClientSecret}
$oauth        = Invoke-RestMethod -Method Post -Uri $loginURL/$tenantdomain/oauth2/token?api-version=1.0 -Body $body

Write-Output $oauth
Please don’t forget: This is an example. Therefor we write down the client secret in cleartext in this script. This is very bad style – never hard code a password in plaintext in a productive script and store this script somewhere! Ok, for our test, it does the job:
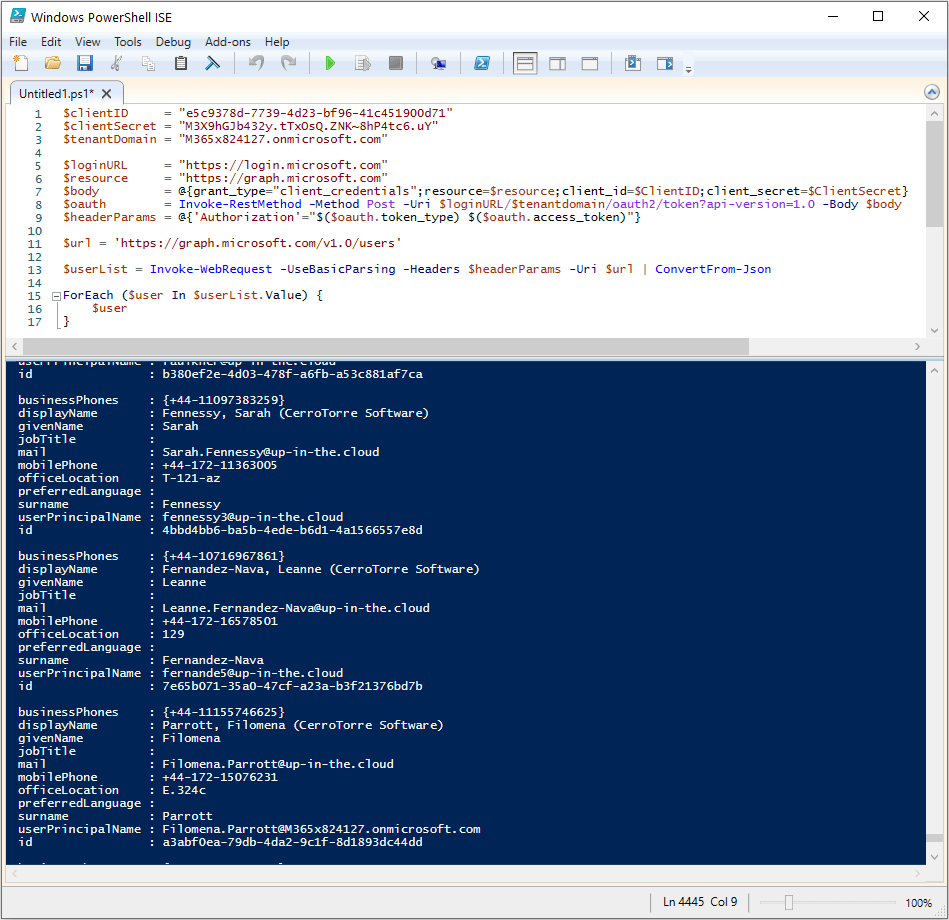
And this is how we get the list of Azure AD accounts with Microsoft Graph. Please note that the most important variable here is the URL string ‘https://graph.microsoft.com/v1.0/users‘. Please refer to the Microsoft Graph API reference, there are a lot of other URLs for the different object types and tasks that you might want to perform with Graph.
$clientID     = "e5c9378d-7739-4d23-bf96-41c451900d71"    #  <-insert your own app ID here
$clientSecret = "M3X9hGJb432y.tTxOsQ.ZNK~8hP4tc6.uY"      #  <-insert your own secret here
$tenantDomain = "M365x824127.onmicrosoft.com"             #  <-insert your own tenant id here

$loginURL     = "https://login.microsoft.com"
$resource     = "https://graph.microsoft.com"
$body         = @{grant_type="client_credentials";resource=$resource;client_id=$ClientID;client_secret=$ClientSecret}
$oauth        = Invoke-RestMethod -Method Post -Uri $loginURL/$tenantdomain/oauth2/token?api-version=1.0 -Body $body
$headerParams = @{'Authorization'="$($oauth.token_type) $($oauth.access_token)"}

#_____________________________________________________________________________________________

$url = 'https://graph.microsoft.com/v1.0/users'

$userList = Invoke-WebRequest -UseBasicParsing -Headers $headerParams -Uri $url | ConvertFrom-Json

ForEach ($user In $userList.Value) {
    $user
}
Or try this:
$userList.Value | Out-GridView
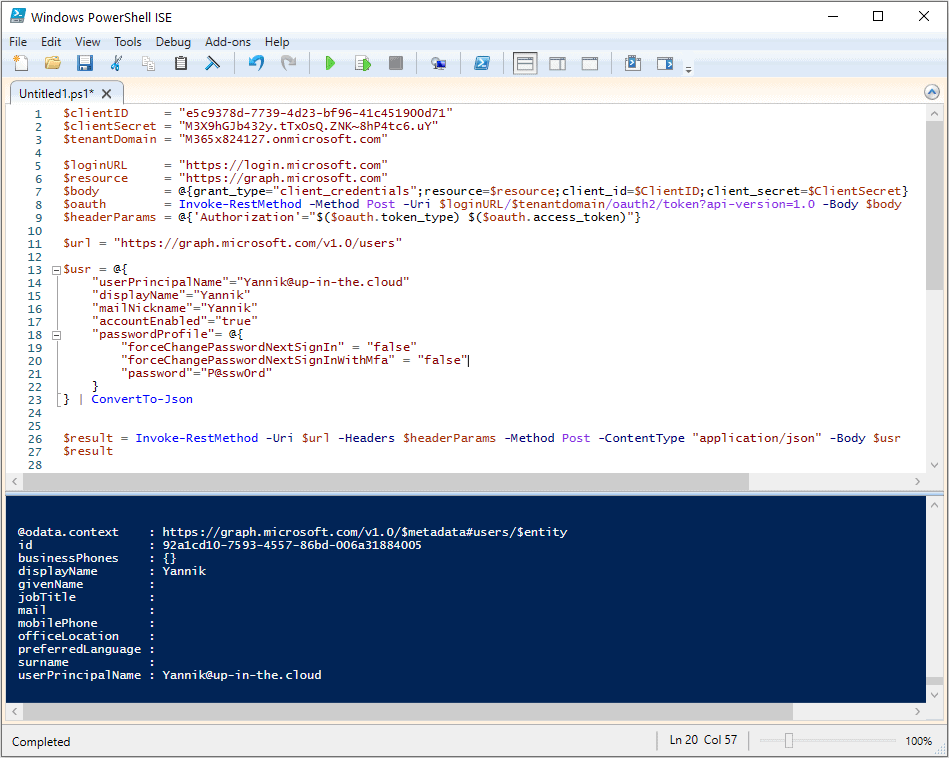
The Graph example script for creating an Azure AD User
Another example where we do some Azure AD write access with Microsoft Graph. The typical task for this to build a special structure that is passed to the API call (typically HTTP POST, sometimes also HTTP PATCH). A simple example is the creation of a new Azure AD user account:
$clientID     = "e5c9378d-7739-4d23-bf96-41c451900d71"    #  <-insert your own app ID here
$clientSecret = "M3X9hGJb432y.tTxOsQ.ZNK~8hP4tc6.uY"      #  <-insert your own secret here
$tenantDomain = "M365x824127.onmicrosoft.com"             #  <-insert your own tenant id here

$loginURL     = "https://login.microsoft.com"
$resource     = "https://graph.microsoft.com"
$body         = @{grant_type="client_credentials";resource=$resource;client_id=$ClientID;client_secret=$ClientSecret}
$oauth        = Invoke-RestMethod -Method Post -Uri $loginURL/$tenantdomain/oauth2/token?api-version=1.0 -Body $body
$headerParams = @{'Authorization'="$($oauth.token_type) $($oauth.access_token)"}

#_____________________________________________________________________________________________

$url = "https://graph.microsoft.com/v1.0/users"

$usr = @{
    "userPrincipalName"="Yannik@up-in-the.cloud"
    "displayName"="Yannik"
    "mailNickname"="Yannik"
    "accountEnabled"="true"
    "passwordProfile"= @{
        "forceChangePasswordNextSignIn" = "false"
        "forceChangePasswordNextSignInWithMfa" = "false"
        "password"="P@ssw0rd"
    }
} | ConvertTo-Json

$result = Invoke-RestMethod -Uri $url -Headers $headerParams -Method Post -ContentType "application/json" -Body $usr
$result