This blog post shows you how to build a GUI object picker for Azure AD user account objects. In Powershell and with the help of the Windows Forms .NET library. In many cloud-related PowerShell scripts, you need to do something with a certain O365 user account. So usually, you edit your script and type in the user’s UPN or maybe even the ObjectID. But that’s annoying if you want to reuse the script for many different users. OK, we let the script show a Read-Host prompt, and then we can type in every time the user’s name or whatever… But I’m too lazy even for that. What I need is a GUI object picker, where I can start to type in the first name or last name.

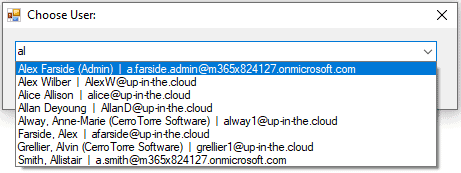
After pressing <ENTER> I want to see a list of real user accounts in the cloud that matches our input – so that we choose from it. For example, I type in “al”, press <Enter>, wait for a (hopefully) quick search in the tenant, then see the dropdown list populated with all accounts that matches the search for “al”:
If we want to get a real quick result from the search – that depends on how we search. Doing a server-side ODATA filtered search with the PowerShell Get-AzureAD -Filter parameter: That can be quite fast indeed. By the way, I just noticed that ODATA filters in Azure AD Powershell are quite poorly described on the Microsoft documentation websites – and I found also not much on other sites. It’s definitely time to write a blog post about these 🙂
Anyway, the filter in our example should be like this: (DisplayName starts with ‘al’) _OR_ (GivenName starts with ‘al’) _OR_ (SurName starts with ‘al’).
That reproduces basically the behavior on the Azure AD and O365 portal websites if you start typing names for searching.
Here is the script for the user account object picker:
Import-Module AzureAD          # first, let's connect to the AzureAD API
Connect-AzureAD

$userID = $null                # the object picker will return the user's ObjectID in this var
$users = @{}                   # a dictionary of users which are returned by the quick search


Add-Type -AssemblyName System.Windows.Forms   # we need to load some libraries for th windows forms handling
Add-Type -AssemblyName System.Drawing
$win = New-Object System.Windows.Forms.Form
$win.StartPosition = 1         # 1 = CenterScreen
$win.Text = 'Choose User:'
$win.FormBorderStyle = 1       # 1 = FixedSingle
$win.Width = 460
$win.height = 110
$win.MaximizeBox = $false
$win.MinimizeBox = $false
$win.KeyPreview = $true
$win.Add_KeyDown({
    if($_.KeyCode -eq 'Escape') {
        $win.Close()
    }
})

$lbl = New-Object System.Windows.Forms.Label
$lbl.Location = New-Object System.Drawing.Point(12, 42)
$lbl.Size = New-Object System.Drawing.Size(100, 15)
$lbl.Text = 'Searching'
$lbl.Visible = $false

$chk = New-Object System.Windows.Forms.Label
$chk.Font = New-Object System.Drawing.Font('Wingdings', 15.75, 1, 3)  # 1, 3 means 'FonStyle=bold', 'GraphicsUnit=point'
$chk.ForeColor = 'Green'
$chk.Location = New-Object System.Drawing.Point(12, 40)
$chk.Size = New-Object System.Drawing.Size(30, 23)
$chk.Text = 'ü'                     # this is the Wingdings char for the 'check'
$chk.Visible = $false

$btn = New-Object System.Windows.Forms.Button
$btn.Text = 'OK'
$btn.Enabled = $false
$btn.Location = New-Object System.Drawing.Point(359, 41)
$btn.Size = New-Object System.Drawing.Size(75, 23)
$btn.Add_Click({                     # the click handler for the button: close dialog and return value
    $script:userID = $script:users[$drop.Text]
    $win.DialogResult = 'OK'
    $win.Close()
})


$drop = New-Object System.Windows.Forms.ComboBox
$drop.Location = New-Object System.Drawing.Point(12, 12)
$drop.Size = New-Object System.Drawing.Size(422, 23)
$drop.AutoCompleteMode = 1           # 1 = SuggestAppend
$drop.AutoCompleteSource = 256       # 256 = ListItems
$drop.Add_KeyDown({                  # the key_down handler for the dropdown, reacts on <ENTER>
    $key = $_.KeyCode
    if ($key -eq 'Enter') {
        if ($btn.Enabled) {          # if search was done already and a valid object is selected, close dialog and return value
            $script:userID = $script:users[$drop.Text]
            $win.DialogResult = 'OK'
            $win.Close()
        } else {                     # search needed based on input ($s)
            $lbl.Visible = $true
            $lbl.Update()
            $script:users = @{}
            $drop.Items.Clear()
            $s = $drop.Text          # do the search with a server side ODATA filter
            Get-AzureADUser -All $true -Filter "startswith(displayName,'$s') or startswith(givenName,'$s') or startswith(surName,'$s')"  | % {
                if ($_.UserType -eq 'Member') {
                    $dis = $_.DisplayName + '  |  ' + $_.UserPrincipalName
                } else {
                    $dis = $_.DisplayName + '  |  ' + $_.Mail
                }
                $script:users.Add($dis, $_.ObjectId)
            }
            $lbl.Visible = $false    # show the results in the dropdown list
            if ($script:users.Count) {
                $script:users.Keys | Sort | % {
                    $drop.Items.Add($_)
                }
                $drop.DroppedDown = $true
            }
        }
    } elseif (($key -ne 'Up') -and ($key -ne 'Down') -and ($key -ne 'Next') -and ($key -ne 'PageUp')) {
        $drop.DroppedDown = $false
    }
})
$drop.Add_TextChanged({               # the text_changed handler for the dropdown
    if ($drop.Items.Contains($drop.Text)) {
        $chk.Visible = $true
        $btn.Enabled = $true
    } else {
        $chk.Visible = $false
        $btn.Enabled = $false
    }
})


$win.Controls.Add($btn)      # build the dialog by adding all the elements to it
$win.Controls.Add($lbl)
$win.Controls.Add($chk)
$win.Controls.Add($drop)

                             # show the dialog, if a user account is rturned, then do something with it...
if ($win.ShowDialog() -eq 'OK') {
    Get-AzureADUser -ObjectId $userID | fl
}
One thought on “The Object Picker – PowerShell meets Windows Forms”
I like to use for something like this
Out-GridView -PassThru
A dialogue is then displayed in which you can select a row. “-PassThru” ensures that an “Ok” button is displayed.
If a line is confirmed with Ok, this value is returned.
e.g.
1..3 | Out-GridView -PassThru