This is a short article about how to install and use the Exchange Online PowerShell module. This is the module called ExchangeOnlineManagement. It provides all the cmdlets like ‘Get-Mailbox’, ‘Enable-MailContact’, or ‘New-DistributionGroup’. If you want to script with Exchange Online mail objects, as well as other important cloud objects like Unified Groups (‘O365 Groups’), then ExchangeOnlineManagement is the choice for you. There is another article on this blog with a general comparison of the modules needed for O365 and Azure AD scripting.
In the beginning, Admins were used to connect to Exchange Online with Remoting (“New-PSSession -ConnectionUri https://outlook.office365 ……” and so on). This is hopelessly outdated and obsolete (no MFA here…. ). There was also another old, obsolete version of an Exchange Online Powershell module which is the reason that you might see our new module to be referred to as ‘Exchange Online Powershell v2’.
And: Never forget that the PowerShell module ExchangeOnlineManagement contains different internal parts:
- Cmdlets for Exchange Online – the normal “mail management”. You have to use Connect-ExchangeOnline to authenticate.
- Cmdlets for the Security and Compliance Center – management of sensitivity labels, retention policies, data loss prevention, or eDiscovery. You have to use Connect-IPPSSession to authenticate.
Again – it’s only one PowerShell module here. But depending on which part you want to use, you need different login cmdlets. After the login, you’ve got a different set of cmdlets which is usable. In this blog post, we only concentrate on Exchange Online…
Prerequisites
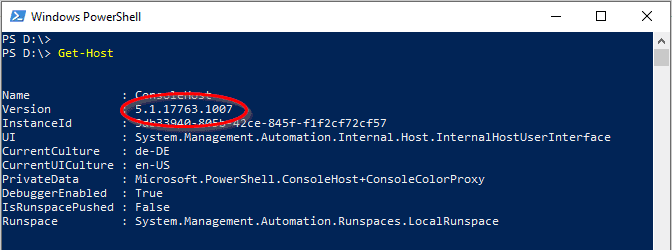
To start with the Exchange Online module, you should have at least Powershell 5.1 on the system. So you are fine on Windows 10 systems and Windows Server 2016 and newer – on older Windows OS version you have to install Powershell 5.1. If you don’t know your current PowerShell version, use this:
Get-Host
You can use the Exchange Online module with PowerShell Core 6 – and also under Powershell 7, this module is supported.
Get it Going
Open an elevated PowerShell console (“Run as Administrator”). Then just use the Install-Module cmdlet:
Install-Module ExchangeOnlineManagement
If you install a PowerShell module from the online repositories for the very first time, then the process informs you that the NuGet provider must be installed first, please agree here with “y”.

There might be another warning that the repository is untrusted. You can agree with “y” because the module is an official Microsoft module in the PowerShell Gallery (which is the repository).

The module is now downloaded from the PowerShell Gallery. Size is less than 10 MB, so it shouldn’t take too long…

After the module installation, you are ready to go. In your script, you always have to import the module first – then you can authenticate to your tenant:
Import-Module ExchangeOnlineManagement
Connect-ExchangeOnline
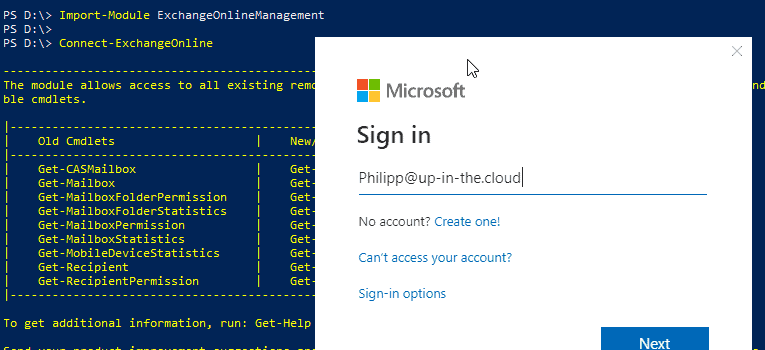
Now you are ready to access the objects in your tenant:

Quiet, please!
If you want to avoid the long explanation text when using the module, just add the “-ShowBanner” parameter:
Import-Module ExchangeOnlineManagement
Connect-ExchangeOnline -ShowBanner:$false
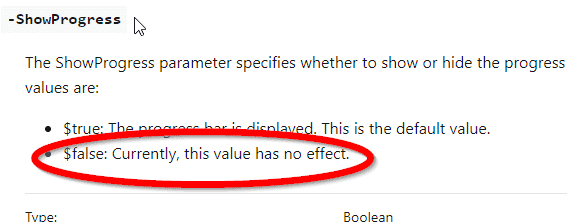
By the way, don’t despair if you can’t get rid of the progressbar which shows the loading of the modules. For the “-ShowProgress:$false”, the Microsoft documentation have this funny statement for you:
Stay Up-to-Date
Don’t forget that Microsoft provides quite regular updates to the ExchangeOnlineManagement Module, so it’s always good to check if there’s an update. You can compare the outputs of Get-InstalledModule (local version) and Find-Modul (version in the Powershell Gallery). If you want to update, do not use “Update-Module” or do not try to uninstall the old version. Performing a normal Install-Module with the -force switch is enough, this will replace the old version with the current one:
Get-InstalledModule ExchangeOnlineManagement
Find-Module ExchangeOnlineManagement

Update-Module ExchangeOnlineManagement
The version list of the developers: Exchange Online Management Module Site in the PowerShell Gallery.
Any Issues?
I wrote a few blog posts about typical error messages when installing and connecting the cloud PowerShell modules:
- Troubleshooting “The following commands are already available on this system”
- Troubleshooting “No match was found for the specified criteria and module name”
- Troubleshooting “New-ExoPSSession : Create Powershell Session is failed using OAuth”
Official Documentation
Microsoft provides an online reference about all cmdlets which come with the ExchangeOnlineManagement module, as well as a detailed description how to install and use the Exchange Online PowerShell:
- Microsoft Description for the entire ExchangeOnlineManagement module
- Microsoft Description especially for the Exchange Online Powershell part in that module
- Microsoft Documentation: How to connect with the ExchangeOnlineManagement module – especially for the Exchange Mangement Powershell
- Microsoft’s Exchange Online Powershell Cmdlet Reference