Azure AD Identity Protection is a good thing. It is not cheap (you need Azure AD Premium P2), but it mitigates risks associated with identity theft.

Examples of what makes the Identity Protection watchdog wake up: A user logs in to his/her Azure AD account, but suddenly from an IP located at a place never seen before for this user. Or the sign-in happens anonymized from a TOR network – the user tries to hide his real IP. Or an IP address is used that has already been noticed because it has communicated with a convicted C&C server of a botnet. And a lot of other cool stuff, see here for a complete list of risks that Identity Protection can detect for the accounts of your tenant.
Now let’s see what we can do to automate this security feature with PowerShell scripting. Basically three things:
- Getting risk detections – the list of all the events where the Identity Protection was triggered to evaluate something as suspicious or dangerous. The list contains only events of the last 90 days.
- Getting risky users – any event is related to a user account. For example, most of them are sign-in events that show some irregularity. Or a strange configuration of rules in the mailbox happens. So the account is marked as “at-risk” – with a certain risk level.
- An administrator can do two things with the risk evaluation of risky users: He can confirm an account to be compromised (-> sets the user’s risk level to ‘high’), or he can dismiss the risk evaluation (-> set the user’s risk level to ‘none’).
In case you’re wondering: “And what about the list of risky sign-ins?”… the risky sign-in list is kind of obsolete because it’s a subset of the risk detections list. OK, most of the risk events are sign-ins, but only most of them! So don’t go without the complete list and always choose the list of risk detections instead of just the list of risky sign-ins!
Prepare your Graph scripting environment
All the scripting shown in this blog post is done with the Microsoft Graph API. So as described in my basic blog post about Graph scripting with PowerShell, you will need an Application Registration first. Important detail: You have to ensure that your app has the proper permission to do the tasks described herein.
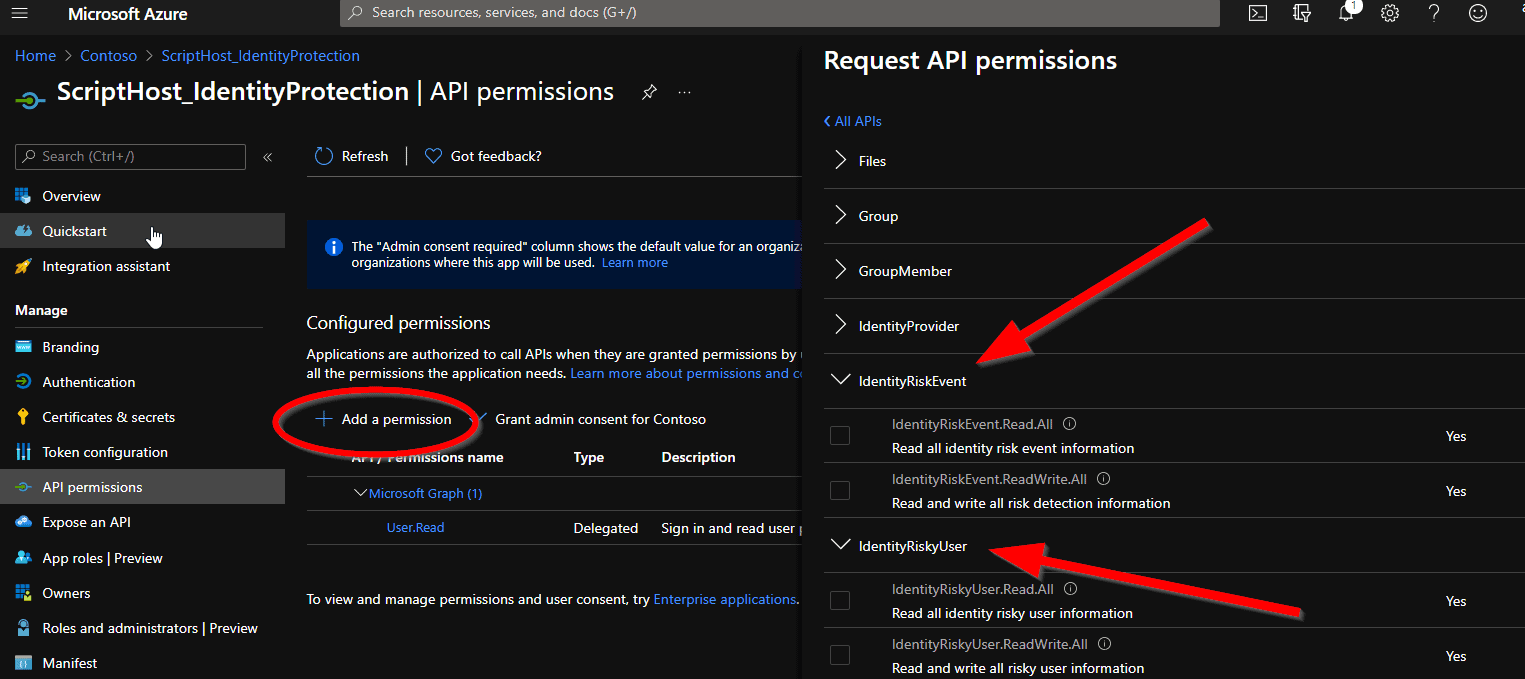
Depending on the list you want to get, you will need the application permission IdentityRiskEvent.Read.All or IdentityRiskyUser.Read.All. If you want to confirm/dismiss, then you need IdentityRiskyUser.ReadWrite.All.
You can find the technical basics about the API functions in the Microsoft Graph documentation for Identity Protection.
Getting the list of Risk Detections

This is the script to get the risk detection list. The first part is about getting the access token, this is basically the same for all graph scripts (don’t expose clear-text secrets in productive environments!).
$clientID       = 'e5c9378d-7739-4d23-bf96-44c451900d71'    #  <-insert your own app ID here
$clientSecret   = 'xCPZi0-6a.01M01lO4UtJCKgF~hLrk-0EB'      #  <-insert your own secret here
$tenantDomain   = 'M365x824527.onmicrosoft.com'             #  <-insert your own tenant id here

$loginURL       = 'https://login.microsoft.com'
$resource       = 'https://graph.microsoft.com'
$body       = @{grant_type="client_credentials";resource=$resource;client_id=$ClientID;client_secret=$ClientSecret}
$oauth      = Invoke-RestMethod -Method Post -Uri $loginURL/$tenantdomain/oauth2/token?api-version=1.0 -Body $body
$headerParams = @{'Authorization'="$($oauth.token_type) $($oauth.access_token)"}

#_______________________________________________________________________________________________

$riskDetections = @()
$url = 'https://graph.microsoft.com/beta/identityProtection/riskDetections?&$top=999'

While ($url -ne $Null) {
    $data = (Invoke-WebRequest -Headers $headerParams -Uri $url) | ConvertFrom-Json
    $riskDetections += $data.Value
    $url = $data.'@Odata.NextLink'
}

$riskDetections
Wondering what the strange while loop is about? This is in the event that a large number of results are returned and no longer fit into a single answer. Learn more about this in my post about Paged Results Queries.
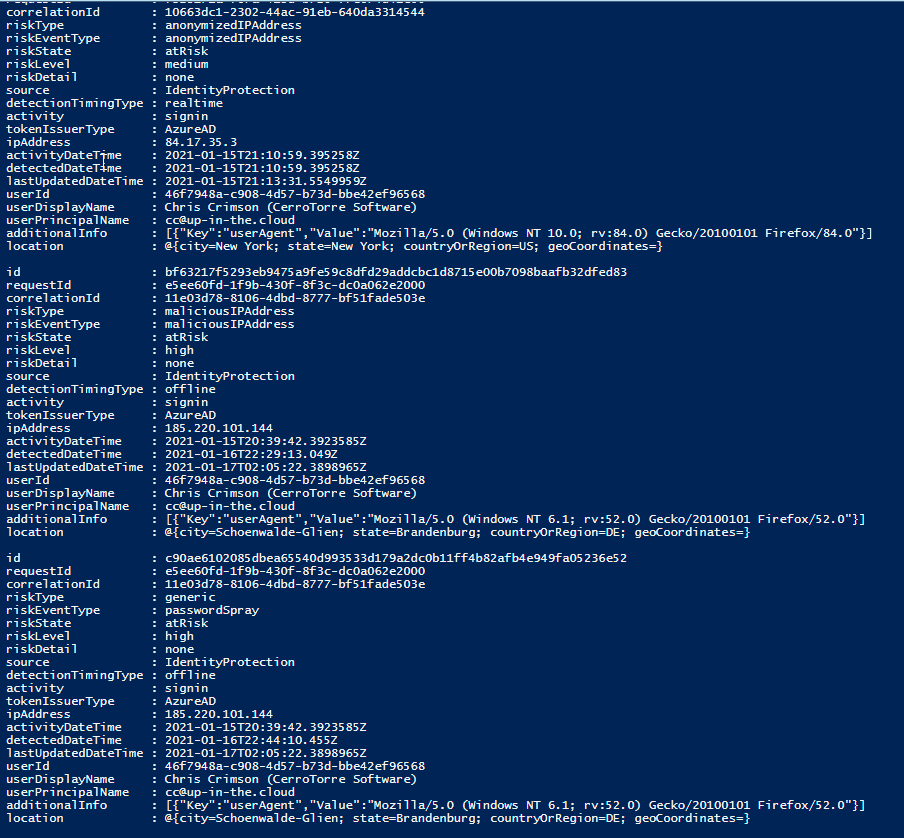
The result:
You can search for the events regarding a specific user….
$riskDetections | Where {$_.userPrincipalName -eq 'cc@up-in-the.cloud'} | select userDisplayName,risktype,activityDateTime
… or a specific date …
$riskDetections | Where {
    ([DateTime]$_.activityDateTime).Date -eq [DateTime]"1/15/2021"
} | Select userDisplayName,risktype,activityDateTime
… or a specific date range. Please note that the [DateTime]”02/01/2021″ means: 1st of February, 00:00). So if you want to filter all risk detections from 02/14/21-02/16/21, you have to filter like this:
$riskDetections | Where {
    $dt = [DateTime]$_.activityDateTime;
    (($dt -ge [DateTime]"2/14/2021") -and ($dt -lt [DateTime]"2/17/2021"))
} | Select userDisplayName,risktype,activityDateTime
Expanding the Sub-Arrays in the output of Risk Detections
If you want to format and output the list in a grid view or export it to Excel or something, you will quickly find out that there are difficulties with the properties ‘additionalInfo’ and ‘location’. These are aggregated sub-types, which you cannot simply export as a flat structure without further preparation.
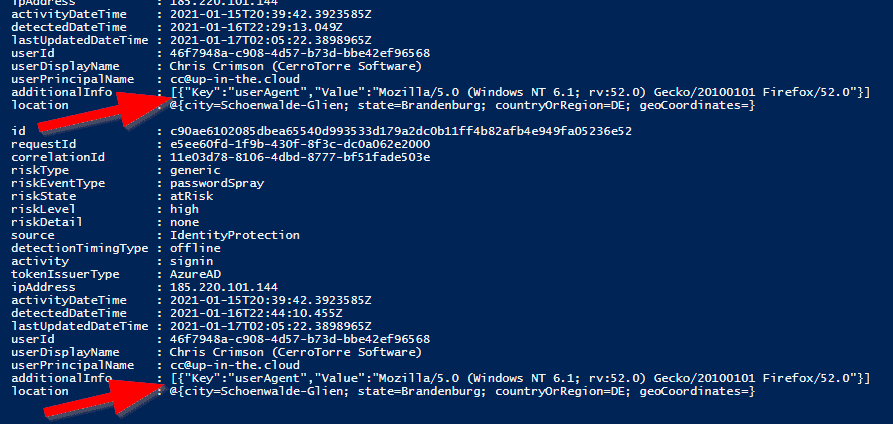
To top it all, they forgot to convert the additional info data into a proper PowerShell hashtable object. So it was kind of forgotten and stayed there as a raw JSON string. Graphs small weaknesses – of all things the JSON conversion, oh dear 🙂
To have a proper, accessible data structure in ‘additionalInfo’, you could do something like this:
$clientID       = 'e5c9378d-7739-4d23-bf96-44c451900d71'    #  <-insert your own app ID here
$clientSecret   = 'xCPZi0-6a.01M01lO4UtJCKgF~hLrk-0EB'      #  <-insert your own secret here
$tenantDomain   = 'M365x824527.onmicrosoft.com'             #  <-insert your own tenant id here

$loginURL       = 'https://login.microsoft.com'
$resource       = 'https://graph.microsoft.com'
$body       = @{grant_type="client_credentials";resource=$resource;client_id=$ClientID;client_secret=$ClientSecret}
$oauth      = Invoke-RestMethod -Method Post -Uri $loginURL/$tenantdomain/oauth2/token?api-version=1.0 -Body $body
$headerParams = @{'Authorization'="$($oauth.token_type) $($oauth.access_token)"}

#_______________________________________________________________________________________________

$riskDetections = @()
$url = 'https://graph.microsoft.com/beta/identityProtection/riskDetections?&$top=999'

While ($url -ne $Null) {
    $data = (Invoke-WebRequest -Headers $headerParams -Uri $url) | ConvertFrom-Json
    $riskDetections += $data.Value
    $url = $data.'@Odata.NextLink'
}


$riskDetections  | % {
    $additionalInfo = [PSCustomObject]@{}

    if (($_.additionalInfo) {
        ($_.additionalInfo | ConvertFrom-Json) | % {
            $additionalInfo | Add-Member -MemberType NoteProperty -Name $_.Key -Value $_.Value
        }
    }

    $_.PsObject.Properties.Remove('additionalInfo')
    $_ | Add-Member -MemberType NoteProperty -Name 'additionalInfo' -Value $additionalInfo
}

$riskDetections

To expand the sub array data into a flat structure can also be important if you want to export this data to a list, for example in Excel. We do the expansion for
- Location
- User Agent (Browser Information)
- Alert URL (for detections triggered from CloudAppSecurity)
These are the most common sets of information in the Risk Detection sub-properties.
$clientID = 'e5c9378d-7739-4d23-bf96-44c451900d71' # <-insert your own app ID here
$clientSecret = 'xCPZi0-6a.01M01lO4UtJCKgF~hLrk-0EB' # <-insert your own secret here
$tenantDomain = 'M365x824527.onmicrosoft.com' # <-insert your own tenant id here
$loginURL = 'https://login.microsoft.com'
$resource = 'https://graph.microsoft.com'
$body = @{grant_type="client_credentials";resource=$resource;client_id=$ClientID;client_secret=$ClientSecret}
$oauth = Invoke-RestMethod -Method Post -Uri $loginURL/$tenantdomain/oauth2/token?api-version=1.0 -Body $body
$headerParams = @{'Authorization'="$($oauth.token_type) $($oauth.access_token)"}
#_______________________________________________________________________________________________
$riskDetections = @()
$url = 'https://graph.microsoft.com/beta/identityProtection/riskDetections?&$top=999'
While ($url -ne $Null) {
$data = (Invoke-WebRequest -Headers $headerParams -Uri $url) | ConvertFrom-Json
$riskDetections += $data.Value
$url = $data.'@Odata.NextLink'
}
$riskDetections | % {
$additionalInfo = [PSCustomObject]@{}
$userAgent = ''
$alertUrl = ''
if (($_.additionalInfo) {
($_.additionalInfo | ConvertFrom-Json) | % {
if ($_.Key -eq "userAgent") {$userAgent = $_.Value}
if ($_.Key -eq "alertUrl") {$alertUrl = $_.Value}
}
}
$_ | Add-Member -MemberType NoteProperty -Name 'userAgent' -Value $userAgent
$_ | Add-Member -MemberType NoteProperty -Name 'alertUrl' -Value $alertUrl
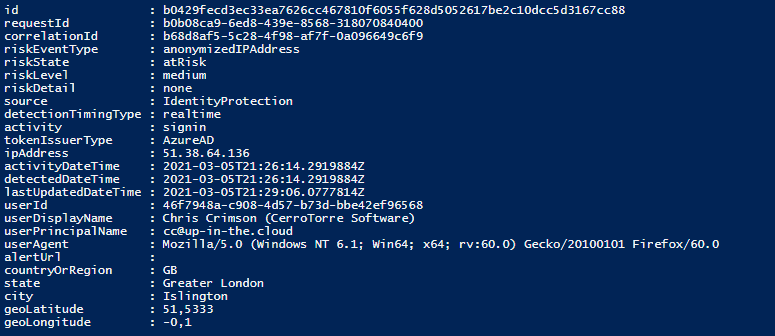
$_ | Add-Member -MemberType NoteProperty -Name 'countryOrRegion' -Value $_.location.countryOrRegion
$_ | Add-Member -MemberType NoteProperty -Name 'state' -Value $_.location.state
$_ | Add-Member -MemberType NoteProperty -Name 'city' -Value $_.location.city
$_ | Add-Member -MemberType NoteProperty -Name 'geoLatitude' -Value $_.location.geoCoordinates.latitude
$_ | Add-Member -MemberType NoteProperty -Name 'geoLongitude' -Value $_.location.geoCoordinates.longitude
$_.PsObject.Properties.Remove('additionalInfo')
$_.PsObject.Properties.Remove('location')
}
$riskDetections
$riskDetections | Export-CSV c:\temp\RiskDetections.csv -NoTypeInformation -Delimiter ";"
Getting the list of Risky Users
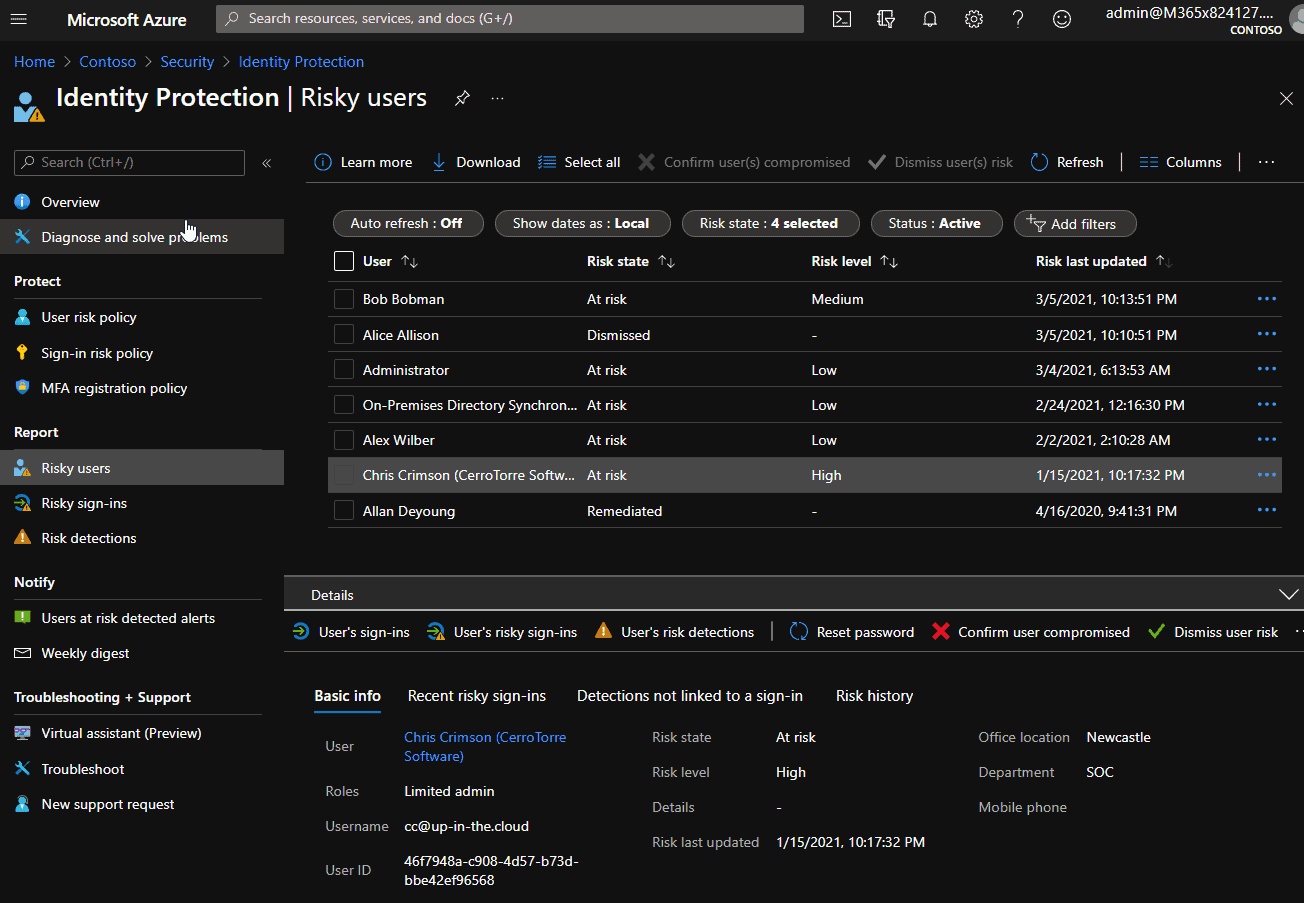
This is the script to get the risky users list. The first part is about getting the access token, this is basically the same for all graph scripts (don’t expose clear-text secrets in productive environments!).
$clientID       = 'e5c9378d-7739-4d23-bf96-44c451900d71'    #  <-insert your own app ID here
$clientSecret   = 'xCPZi0-6a.01M01lO4UtJCKgF~hLrk-0EB'      #  <-insert your own secret here
$tenantDomain   = 'M365x824527.onmicrosoft.com'             #  <-insert your own tenant id here

$loginURL       = 'https://login.microsoft.com'
$resource       = 'https://graph.microsoft.com'
$body       = @{grant_type="client_credentials";resource=$resource;client_id=$ClientID;client_secret=$ClientSecret}
$oauth      = Invoke-RestMethod -Method Post -Uri $loginURL/$tenantdomain/oauth2/token?api-version=1.0 -Body $body
$headerParams = @{'Authorization'="$($oauth.token_type) $($oauth.access_token)"}

#_______________________________________________________________________________________________

$riskyUsers = @()
$url = 'https://graph.microsoft.com/beta/identityProtection/riskyUsers?&$top=999'

While ($url -ne $Null) {
    $data = (Invoke-WebRequest -Headers $headerParams -Uri $url) | ConvertFrom-Json
    $riskyUsers += $data.Value
    $url = $data.'@Odata.NextLink'
}

$riskyUsers
Wondering what the strange while loop is about? This is in the event that the backend returns a large number (>100) of results and no this longer fit into a single answer. Learn more about this in my post about Paged Results Queries.
The result:

Getting more information about one risky user
If you want to read more information about a user in the Risky Users list, you could just take the ‘id’ value there (actually, it’s the official ObjectId property of this user).
This is the script to get the risk information only for one account. The first part is about getting the access token, this is basically the same for all graph scripts (don’t expose clear-text secrets in productive environments!).
$clientID       = 'e5c9378d-7739-4d23-bf96-44c451900d71'    #  <-insert your own app ID here
$clientSecret   = 'xCPZi0-6a.01M01lO4UtJCKgF~hLrk-0EB'      #  <-insert your own secret here
$tenantDomain   = 'M365x824527.onmicrosoft.com'             #  <-insert your own tenant id here

$loginURL       = 'https://login.microsoft.com'
$resource       = 'https://graph.microsoft.com'
$body       = @{grant_type="client_credentials";resource=$resource;client_id=$ClientID;client_secret=$ClientSecret}
$oauth      = Invoke-RestMethod -Method Post -Uri $loginURL/$tenantdomain/oauth2/token?api-version=1.0 -Body $body
$headerParams = @{'Authorization'="$($oauth.token_type) $($oauth.access_token)"}

#_______________________________________________________________________________________________

$url = 'https://graph.microsoft.com/v1.0/identityProtection/riskyUsers/46f7948a-c908-4d57-b73d-bbe42ef96568'    # <- the ObjectID of your user

$riskyUser = Invoke-WebRequest -Headers $headerParams -Uri $url | ConvertFrom-Json

$riskyUser
Or how about just creating a request to the normal users API, with this specific object ID?
$clientID       = 'e5c9378d-7739-4d23-bf96-44c451900d71'    #  <-insert your own app ID here
$clientSecret   = 'xCPZi0-6a.01M01lO4UtJCKgF~hLrk-0EB'      #  <-insert your own secret here
$tenantDomain   = 'M365x824527.onmicrosoft.com'             #  <-insert your own tenant id here

$loginURL       = 'https://login.microsoft.com'
$resource       = 'https://graph.microsoft.com'
$body       = @{grant_type="client_credentials";resource=$resource;client_id=$ClientID;client_secret=$ClientSecret}
$oauth      = Invoke-RestMethod -Method Post -Uri $loginURL/$tenantdomain/oauth2/token?api-version=1.0 -Body $body
$headerParams = @{'Authorization'="$($oauth.token_type) $($oauth.access_token)"}

#_______________________________________________________________________________________________

$url = 'https://graph.microsoft.com/v1.0/users/46f7948a-c908-4d57-b73d-bbe42ef96568'    # <- the ObjectID of your user

$riskyUser = Invoke-WebRequest -Headers $headerParams -Uri $url | ConvertFrom-Json

$riskyUser
Or you want a list of all the risk events which led to the risk evaluation for this user. This is called the user’s risk history. The risk history contains only events from the last 90 days.
$clientID       = 'e5c9378d-7739-4d23-bf96-44c451900d71'    #  <-insert your own app ID here
$clientSecret   = 'xCPZi0-6a.01M01lO4UtJCKgF~hLrk-0EB'      #  <-insert your own secret here
$tenantDomain   = 'M365x824527.onmicrosoft.com'             #  <-insert your own tenant id here

$loginURL       = 'https://login.microsoft.com'
$resource       = 'https://graph.microsoft.com'
$body       = @{grant_type="client_credentials";resource=$resource;client_id=$ClientID;client_secret=$ClientSecret}
$oauth      = Invoke-RestMethod -Method Post -Uri $loginURL/$tenantdomain/oauth2/token?api-version=1.0 -Body $body
$headerParams = @{'Authorization'="$($oauth.token_type) $($oauth.access_token)"}

#_______________________________________________________________________________________________

$url = 'https://graph.microsoft.com/v1.0/identityProtection/riskyUsers/46f7948a-c908-4d57-b73d-bbe42ef96568/history'

$riskHistory = (Invoke-WebRequest -Headers $headerParams -Uri $url | ConvertFrom-Json).Value

$riskHistory
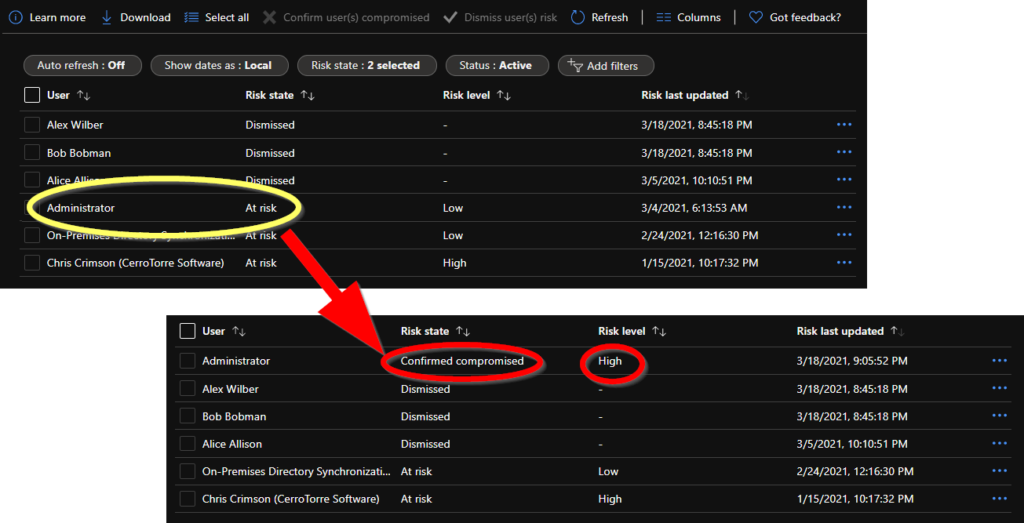
How to confirm a user as compromised – and how to dismiss a risk detection
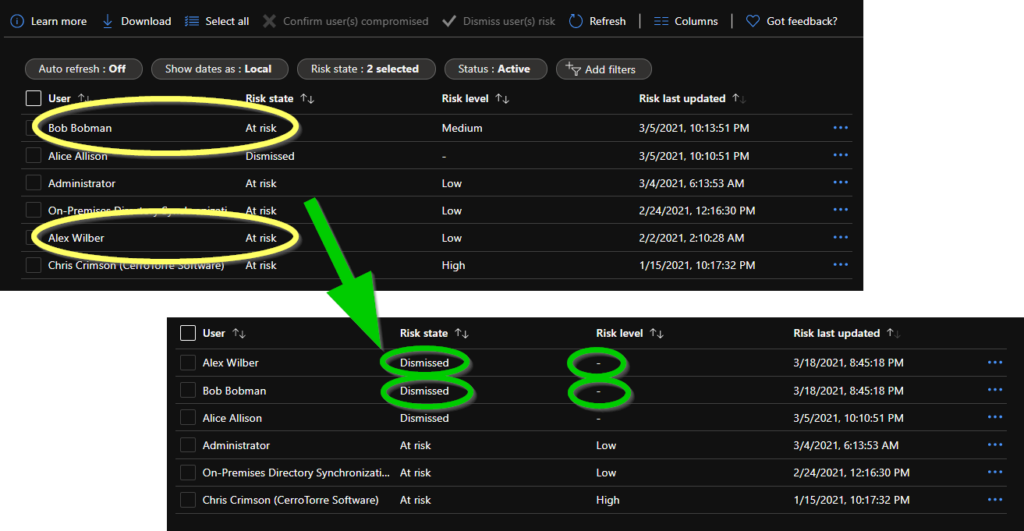
If you are responsible to check the Risk Detection list and evaluate the real circumstances, you can react on the risky events for a user account in two ways:
- You can confirm the account as compromised. The account will be marked with a risk level ‘High’. Each process or policy which reacts on this risk level will react accordingly. So if you have a risk-based conditional access policy in place, which prevents the authentication of high-risk users, the account will be blocked.
- You can dismiss the risk. Then you evaluate the risk detection as a false positive. This sets the user’s risk level to ‘None’.
First, let’s confirm a user as compromised. You need the ObjectID of the user. This was given in the list of Risk Detections as “userID” or in the list of Risky Users as “id”. Or you just get it with other ways, like a normal “Get-AzureADUser …..”. In our example, let’s confirm the Administrator account as compromised. Let’s hope you never have to do that in your production environment 🙂
$clientID       = 'e5c9378d-7739-4d23-bf96-44c451900d71'    #  <-insert your own app ID here
$clientSecret   = 'xCPZi0-6a.01M01lO4UtJCKgF~hLrk-0EB'      #  <-insert your own secret here
$tenantDomain   = 'M365x824527.onmicrosoft.com'             #  <-insert your own tenant id here

$loginURL       = 'https://login.microsoft.com'
$resource       = 'https://graph.microsoft.com'
$body       = @{grant_type="client_credentials";resource=$resource;client_id=$ClientID;client_secret=$ClientSecret}
$oauth      = Invoke-RestMethod -Method Post -Uri $loginURL/$tenantdomain/oauth2/token?api-version=1.0 -Body $body
$headerParams = @{'Authorization'="$($oauth.token_type) $($oauth.access_token)"}

#_______________________________________________________________________________________________

$userID_01 = 'a8de28ca-48b0-4bf4-8a22-31fb150b2545'   #  <-Administrator in our example, put here your own user ID

$userList = @{
    'userIDs' = @($userID_01)
} | ConvertTo-Json

$url = 'https://graph.microsoft.com/v1.0/identityProtection/riskyUsers/confirmCompromised'

$result = Invoke-RestMethod -Uri $url -Headers $headerParams -Method Post -ContentType "application/json" -Body $userList
Please note that the $userList that you pass to the request as a parameter has always to be an array, even if you only want to confirm only one user. In the next example, we dismiss two user accounts in one step:
$clientID       = 'e5c9378d-7739-4d23-bf96-44c451900d71'    #  <-insert your own app ID here
$clientSecret   = 'xCPZi0-6a.01M01lO4UtJCKgF~hLrk-0EB'      #  <-insert your own secret here
$tenantDomain   = 'M365x824527.onmicrosoft.com'             #  <-insert your own tenant id here

$loginURL       = 'https://login.microsoft.com'
$resource       = 'https://graph.microsoft.com'
$body       = @{grant_type="client_credentials";resource=$resource;client_id=$ClientID;client_secret=$ClientSecret}
$oauth      = Invoke-RestMethod -Method Post -Uri $loginURL/$tenantdomain/oauth2/token?api-version=1.0 -Body $body
$headerParams = @{'Authorization'="$($oauth.token_type) $($oauth.access_token)"}

#_______________________________________________________________________________________________

$userID_01 = 'a8de28ca-48b0-4bf4-8a22-31fb150b2545'   #  <-Bob Bobman  in our example, put here your own user ID
$userID_02 = 'b3106aa4-74f2-4f20-8cd0-4db523e6a73f'   #  <-Alex Wilber in our example, put here your own user ID

$userList = @{
    'userIDs' = @($userID_01, $userID_02)
} | ConvertTo-Json

$url = 'https://graph.microsoft.com/v1.0/identityProtection/riskyUsers/dismiss'

$result = Invoke-RestMethod -Uri $url -Headers $headerParams -Method Post -ContentType "application/json" -Body $userList
…and now have fun with scripting Identity Protection. But as always, you do it at your own risk… 😆